Second Mixer, Crystal Oscillator and Amplifier


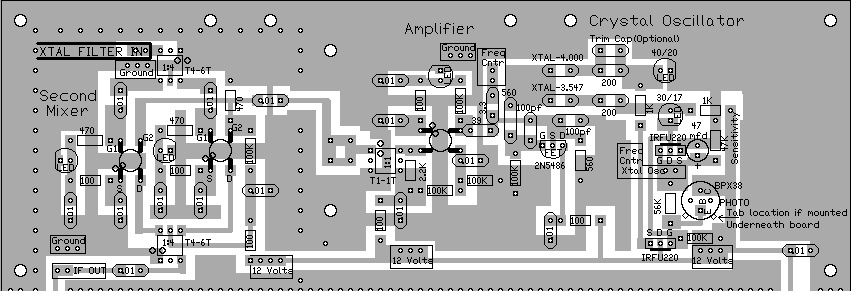
To learn about the Second Mixer, read the
Circuit Details - Second Mixer
before building this section.

To learn about the Crystal Oscillator, read the
Circuit Details - Crystal Oscillator/Amplifier
before building this section.

To get the best print of the above picture, right click the mouse on the image, select "View Image". In the new browser window, click print, set layout to "Landscape", then "OK" to print.

Approximate time to complete 1:05

Picture | Picture

____Mount spacers on each side of the board on the four corners to provide support for insertion of parts and easy soldering. Picture

Insert all the components that have their values inside the footprint. They are the following:

____15 - .01 capacitors (Bag 3)

Solder

____6 - 100 ohm resistors (brown, black, brown) (Bag 3)
____5 - 100K resistors (brown, black, yellow) (Bag 3)

Solder

Resistors:

____3 - 470 ohm (Bag 4), All located inside the second mixer.
____1 - 2.2K (Bag 4), Located next to Minicircuits T1-1T at the Amplifier.
____1 - 560 ohm (Bag 5), (rectangle footprint) Located on the right side of the FET (2N5486). Be careful, there is also a capacitor (rounded footprint) labeled 560.
____2 - 1K (Bag 3), One is located on the left side of the 30/17 LED, and one is located on the right side of the 30/17 LED
____1 - 47K (Bag 6), Located below the 1K resistor.
____1 - 56K (Bag Xtal Osc Mods), Located left of BPX38 at right side of section

Capacitors (Going left to right on the board):

____1 - 39pf NPO (Bag 4), Located to the right side of the MOSFET in the Amplifier. Small, blue colored, short leads, labeled "390J, 201".
____2 - 100pf NPO (Bag 3), Located at the left side and above the FET (2N5486). Orange color, short leads flared out, labeled "101".
____1 - 560pf Mica (Bag 6), Located to the right of the 3.3pf cap. Brown color, large size, labeled "560 +/- 2%, 300V", or "CM05FC, 561J03, SE"
____2 - 200pf Mica (Bag 5), Located to the right of the crystals. Large brown cap, labeled "200 +/- 1%". The Optional Trim Cap is used to trim the 4.000MHz frequency so the BFO tones match when changing bands. This Trim Cap is not included in the kit.
____1 - 3.3pf NPO (Bag 4), Located below "Freq Cntr" box between the Oscillator and the Amplifier. Orange colored, small square, leads flared out, labeled "3R3 D", or short leads, grey with black top, labeled "3R3" (R looks like a P).
____1 - 47mfd electrolytic ((Bag Xtal Osc Mods), located above BPX38 at right side of section

Solder

Other Parts:

____5 - LEDs (Bag 3), Red colored, match the flat on the LED to the flat on the footprint. The short lead is on the same side as the flat.
____2 - T4-6T Minicircuits 1:4 transformers (Bag 4), Note the dot on the part and match it to the dot on the footprint. A dot is outside the footprint so that you can double check your work after it is mounted. Located at the top and bottom of the second mixer.
____1 - T1-1T Minicircuits 1:1 transformer (Bag 4), Note the dot on the part and match it to the dot on the footprint. A dot is outside the footprint so that you can double check your work after it is mounted. Located to the left of the MOSFET at the Amplifier.
____1 - 2N5486 (Bag 4), Spread the end pins slightly so they fit through the holes. Do not force all the way down onto the PCB and stress the pins. Note flat side of part and match to the flat side of the footprint.
____2 - IRFU220 (Bag 2), static sensitive part, please touch a ground wire before taking it out of the bag. Note thick black line on footprint, this shows where the heat sink of the part should be mounted. Located above and below the BPX38. Marked "FU220, IR 625T,32 03"

Solder

Crystal Oscillator Switching, Crystals, and Phototransistor

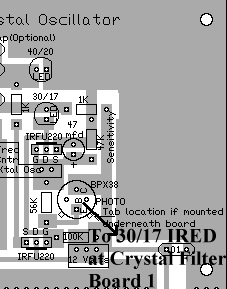
____1 - Phototransistor (Bag 5), transistor looking part with three leads and a glass face, the "B" pin is not connected to any traces and can be soldered after the device has been aimed at the IR LED, if desired (not necessary).

Click on Picture to see how the PhotoTransistor is mounted underneath the board.

The phototransistor aims at the IR LED near the outside of Board 1 at the 4.000 MHz crystal filter. Note the location of the tab when mounted underneath the board. This is done when the boards are stacked as shown on the home page. Picture

Solder

____1 - 3.457MHz crystal (Bag 4), Has a gray plastic cover over the crystal with the markings "NYMPH C O 17915-03".
____1 - 4.000MHz crystal (Bag 4), The markings are "4000 KSS 2FT".

Solder

____3 - MOSFETS (Bag 2), (Picture) static sensitive part, touch a ground wire before taking it out of the bag, notice the dot on MOSFET (may be difficult to see, hold at an angle to a light source and you can see the shadow of the dot), the dot is located to the left of the second line of the text on the MOSFET. A dot is placed outside the footprint so that you can double check your placement after it has been soldered to the PCB. The leads on each side of the part need to spread apart slightly to fit the footprint.

Solder

Double Checking Your Work

____Check the dot on the MOSFETs and the Minicircuits transformers.
____Place the PCB in front of a bright light. If you see light shining through any of the soldering holes, you missed a solder connection.
____Check the flats on the LEDs and make sure they fit the flat on the footprint.
____Check the IRFU220s, make sure the heat sink of the part is directly above the thick black line on the footprint.
____Check the flat on the 2N5486 and make sure it matches the footprint.
____Check the tab on the BPX-38 Phototransistor and make sure it matches the footprint, according to how you are mounting it, either above the board or below the board.

Next Section

Send E-Mail || Amateur Radio Receivers || Electroluminescent Receiver || Back to Basic Instructions


Last Update: 4/17/15
Web Author: David White, WN5Y Free Website Translator