Second Mixer, Crystal Oscillator and Amplifier


.01 Caps || 100 Ohm Resistors || 100K Resistors || Resistors || Capacitors
LEDs, Transformers. FETs, IRFU220 || MOSFETs || Crystal

455KHz IF Strip, AGC and S-Meter

To learn about the Second Mixer, read the
Circuit Details - Second Mixer
before building this section.

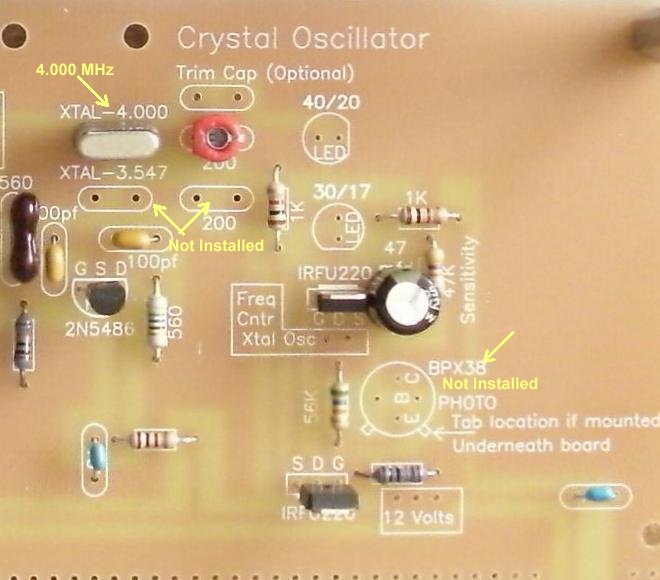
To learn about the Crystal Oscillator, read the
Circuit Details - Crystal Oscillator/Amplifier
before building this section.

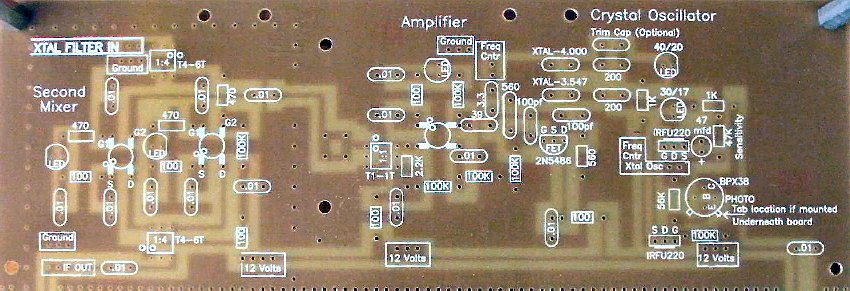
____Mount spacers on the four corners of the board to provide support for insertion of parts and easy soldering.

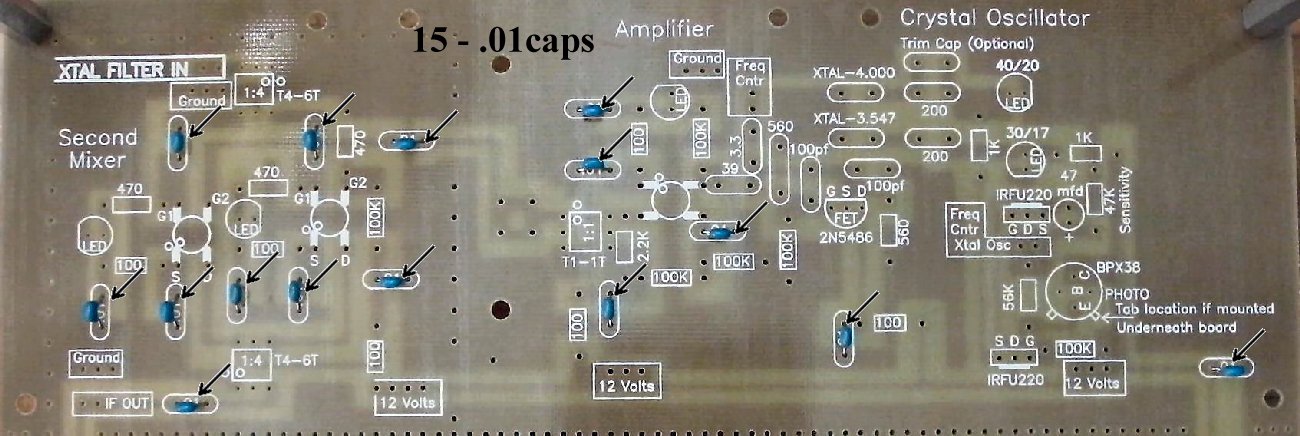
Insert all the components that have their values inside the footprint. They are the following:

____15 - .01 capacitors (Bag 3)

Solder

____6 - 100 ohm resistors (brown, black, brown) (Bag 3)

Solder

____6 - 100K resistors (brown, black, yellow) (Bag 3)

Solder

Resistors:

____2 - 1K (Bag 3), One is located on the left side of the 30/17 LED, and one is located on the right side of the 30/17 LED
____3 - 470 ohm (Bag 4), All located inside the second mixer.
____1 - 2.2K (Bag 4), Located next to Minicircuits T1-1T at the Amplifier.
____1 - 560 ohm (Bag 5), (rectangle footprint) Located on the right side of the FET (2N5486). Be careful, there is also a capacitor (rounded footprint) labeled 560.
____1 - 47K (Bag 6), Located below the 1K resistor.
____1 - 56K (Bag 6), Located left of BPX38 at right side of section

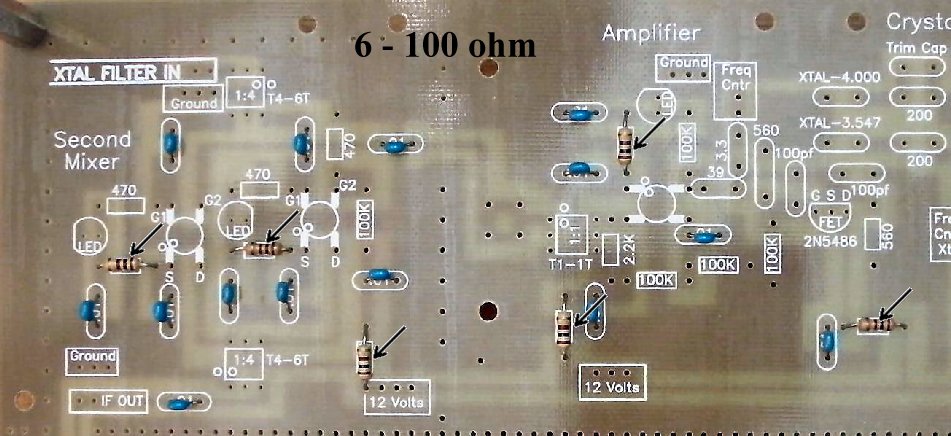
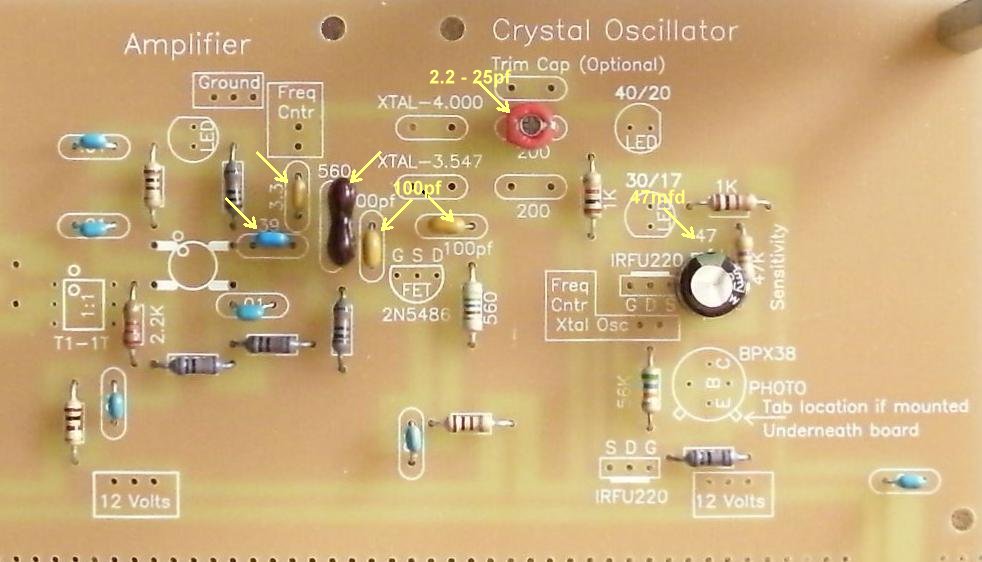
Solder

Capacitors (Going left to right on the board):

____2 - 100pf NPO (Bag 3), Located at the left side and above the FET (2N5486). Orange color, short leads flared out, labeled "101".
____1 - 39pf NPO (Bag 4), Located to the right side of the MOSFET in the Amplifier. Small, blue colored, short leads, labeled "390J, 201".
____1 - 3.3pf NPO (Bag 4), Located below "Freq Cntr" box between the Oscillator and the Amplifier. Orange colored, small square, leads flared out, labeled "3R3 D", or short leads, grey with black top, labeled "3R3" (R looks like a P).
____1 - 200pf Mica (Bag 5), Located to the right of the 3.547 MHZ crystal. Large brown cap, labeled "200 +/- 1%". On the BLT, the 4.000 MHz has to be lowered in frequency 1 kHz so the harmonics do not interfere with the 14 MHz and 28 MHz bands. Therefore, an RF Choke is installed next to the 4.000 MHz crystal. More information for pulling the crystal is at Tuning Oscillator Frequency.
____1 - 2.2 -25pf trimmer capacitor, (Bag 3) Install in the capacitor footprint labeled 200 to the right of the 4.000 MHz crystal as shown below. A 200pf Mica used to go in this footprint.
____1 - 560pf Mica (Bag 6), Located to the right of the 3.3pf cap. Brown color, large size, labeled "560 +/- 2%, 300V", or "CM05FC, 561J03, SE"
____1 - 47mfd electrolytic ((Bag 6), located above BPX38 at right side of section

Solder

Other Parts:

____5 - LEDs (Bag 3), Red colored, match the flat on the LED to the flat on the footprint. The short lead is on the same side as the flat.
____2 - T4-6T Minicircuits 1:4 transformers (Bag 4), Note the dot on the part and match it to the dot on the footprint. A dot is outside the footprint so that you can double check your work after it is mounted. Located at the top and bottom of the second mixer.

Note: Tin all the leads on the transformers - T4-6T and T1-1T - as the pads they solder to are small. This will make a solid solder joint. Wipe the excess solder to the top of the pin so it will fit in the holes.

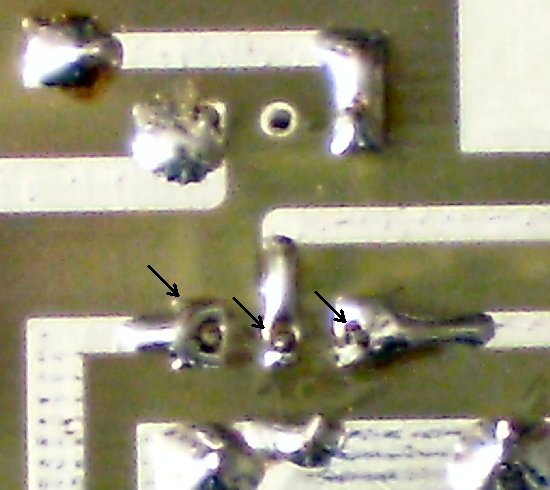
Double check your soldering to make sure you make a good solder
joint to the pins - check out the pins pointed out by the arrows below.

With the bad solder joints below, the LEDs in the mixer did not light up when power was applied.
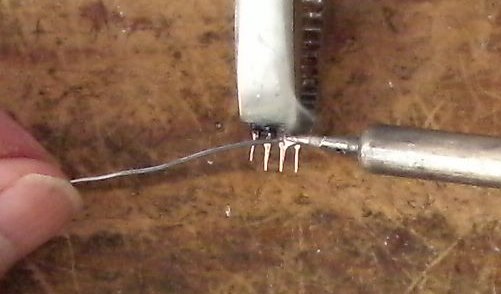
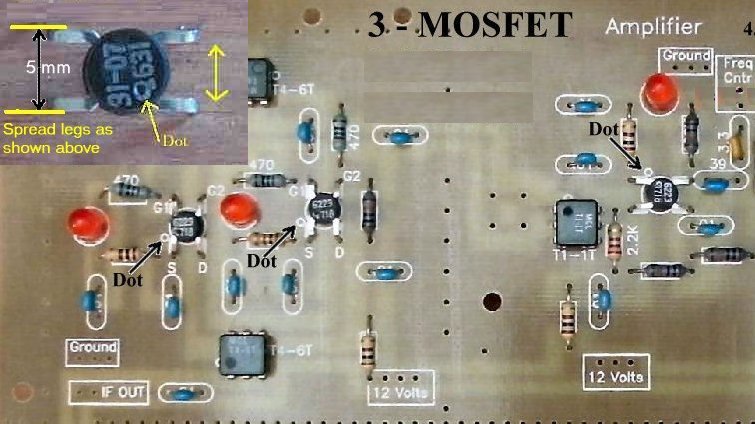
____1 - T1-1T Minicircuits 1:1 transformer (Bag 4), Same notes as above. Located to the left of the MOSFET at the Amplifier.
____1 - 2N5486 (Bag 4), Spread the end pins slightly so they fit through the holes. Do not force all the way down onto the PCB and stress the pins. Note flat side of part and match to the flat side of the footprint.
____2 - IRFU220 (Bag 2), static sensitive part, please touch a ground wire before taking it out of the bag. Note thick white line on footprint, this shows where the heat sink of the part should be mounted. Located above and below the BPX38. Marked "FU220, IR 625T,32 03"

Solder

____3 - MOSFETS (Bag 2), (Picture) static sensitive part, touch a ground wire before taking it out of the bag, notice the dot on MOSFET (may be difficult to see, hold at an angle to a light source and you can see the shadow of the dot), the dot is located to the left of the second line of the text on the MOSFET.

A dot is placed outside the footprint so that you can double check your placement after it has been soldered to the PCB. The leads on each side of the part need to spread apart slightly to fit the footprint.

Solder

Crystal Oscillator Switching, Crystals, and Phototransistor

BLT Modifications

On the Blue Lightning Transceiver, all the crystals in the Crystal Filter will be the same. The 3.547 MHz crystals will be in both Crystal Filters. By changing the caps used in the Filters, a narrow filter (100pf) and a wide filter (39pf) are built and switched by the Crystal Filter switch.

Using 3.547 MHz Crystal Filters:
Do not install the Phototransistor (BPX-38). This will lock the Crystal Oscillator to use the 4.000 MHz crystal, giving 455 kHz output to the IF strip.

Solder

Crystals

____1 - 4.000MHz crystal (Bag 4), The markings are "RXD MP49 4.000 TaiWan A7" or "EA0380J 4.000 0640A".

Solder

Double Checking Your Work

____Check the dot on the MOSFETs and the Minicircuits transformers.
____Place the PCB in front of a bright light. If you see light shining through any of the soldering holes, you missed a solder connection.
____Check the flats on the LEDs and make sure they fit the flat on the footprint.
____Check the IRFU220s, make sure the heat sink of the part is directly above the thick white line on the footprint.
____Check the flat on the 2N5486 and make sure it matches the footprint.
____Check the tab on the BPX-38 Phototransistor and make sure it matches the footprint, according to how you are mounting it, either above the board or below the board.

Board 2, Section 2

Send E-Mail || Amateur Radio Receivers || Back to SWL Instructions for the Blue Lightning Transceiver


Last Update: 6/20/2019
Web Author: David White, WN5Y Free Website Translator